Review copy provided by Ubisoft.
Introduction
Hello, my name is Victor and I am a gamer with degenerative myopia since I was born. To give some context I had to wear glasses when I was 2 years and as of today I have lost more than 90% of my vision. I am not able to read any text for more than 10 years without using the windows magnifier at 700% to read in all games and more recently the narrator has become my favourite accessibility tool. This is my feedback on Watch Dogs Legion from a low vision perspective.
SETTINGS
When we run the game for the first time we are shown the initial adjustments.

The first option here is to enable Menu Narration. You will not miss it because this option is narrated when you select or hover over it, even if it is disabled. This is much more convenient than having to search for it using the magnifier, allowing me to just turn it on as soon as I run the game and the rest of the setup process is completely accessible. Then we can change the Spoken Language and the Written Language for in-game voices and texts. Written language also affects Menu Narration, meaning it’s localized which is great. There is Color Blindness Mode where we can choose between Off, Protanopia, Deuteranopia and Tritanopia. Players can also choose Subtitle Mode between Off / Dialogue / Full Caption and the last option is Gameplay Events CC where you can toggle on / off for closed captioning for gameplay events (Sirens, Explosions).


The next step is Image Calibration. Here you can adjust the Brightness, Gamma, Contrast and HDR settings. I just increased the contrast to 78%.
After we are done with the initial adjustments, we can configure these and more in the options menus before starting our campaign.
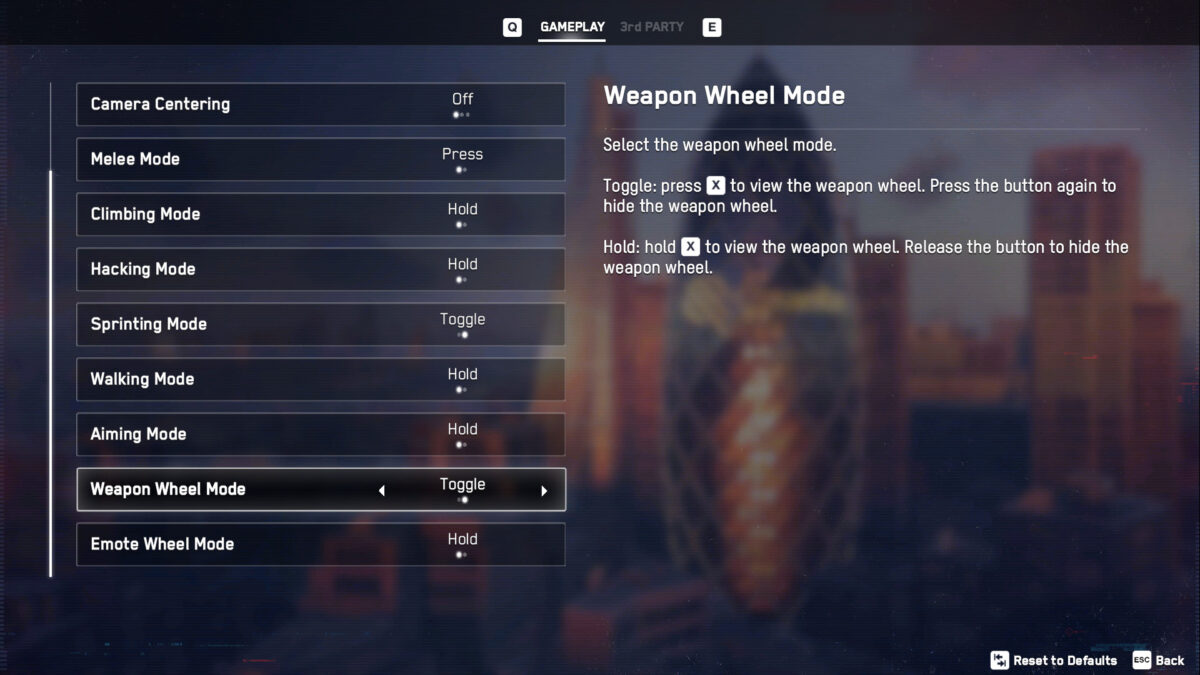

In Gameplay the player can change the Single Player Difficulty between Easy, Normal and Hard. Also choose a Permadeath Mode, when enabled your operatives only have one life. Camera Centering with off, Sprinting and Always modes. Sprinting Mode, Weapon and Emote Wheel mode and a few others have press / hold / toggle options. I just changed the Sprinting mode to toggle and left Permadeath disabled.


Next is Mouse and Keyboard. In Customize Controls you can modify your key remappings. Some other options are, Look and Aim Sensitivity with sliders, Hacking Aim Assist slider from 0 to 100. We can also modify some driving settings such as Steering Response, Driving Camera Centering, Driving Camera Sensitivity, Steering Curve and others. I left everything as it was by default except for Hacking Aim Assist which I increased to 90%. This makes it easier to select your hacking target as it increases the area of that each target, so you don’t need to point exactly at the center of it. This way I don’t have to focus so much energy on aiming hackable targets.


Moving forward to Gamepad we have Look and Aim sensitivity sliders, Aim Snap that allows the player to adjust how strongly the camera snaps onto targets when entering aiming mode, you can modify it from off / default / Strong. Aim Magnetism that slows the camera movement when aiming at a target. You can set it to off / default / strong. This option does not have any impact when the Accessibility option Lock-on is set to on. I played mostly using keyboard and mouse because I prefer to aim myself but for someone needing or preferring to use them, they could help.


In HUD we can make some really cool adjustments. You can set the Reticle on / off, choose the Reticle Style from a simple Dot, Circle, Reflex Sides and a Cross. We can also change the Reticle Colour and Reticle Enemy Colour. The first one is the color for the aim reticle and the second will be used when it is on a valid target. We can change this color from, white, black, yellow, sky blue, blue, red, green, pink and purple. I chose yellow for Reticle color and red color when aiming at an enemy, for better visibility. These are shown on the right side giving you a good preview. You can also increase the Reticle Size from 100 to 150%. We have the same settings for the Hacking Reticle, Hacking Reticle on /off, Hacking Reticle color and size. I set all the size sliders to the maximum, which was really helpful.


In HUD Elements we can turn on or off every element displayed on the screen such as Mission-Objectives Icons, Minimap, Enemy health bars, GPS line, Enemy Detection, Scanning Highlights etc. I just let everything on. The previews on the right side show exactly how these look depending on how we set them.
Moving to Video we have three tabs.
On Video Display we can change the Video Adapter you want to use in case you have more than one, Window Resolution, Window Mode, Monitor Refresh Rate, V-Sync, FPS Limit, Field of View that you can increase / decrease from 70 to 110.


In Video Quality you can change some usual settings like DirectX, Graphics Quality, Geometry, Environment, Texture Resolution, Texture Filtering, Shadows, Headlight Shadows, Reflections and Depth of Field. I disabled Motion Blur and Bloom to remove blurriness and extra lighting that makes it more difficult to see clearly.


The Video Image section contains the same Image Calibration shown on the initial adjustments. Brightness, Gamma, Contrast, Sharpness, and HDR Options. One extra setting found here is Sharpness.


In Audio and Language, we can choose the Spoken and Written Language, adjust Master, Music, Dialogue, SFX, Chat Sound Volume sliders from 0 to 100. I always turn the music volume down a good bit to focus on important sounds in the game, because they provide me valuable information. We can also change the Subtitle Mode from Off / Dialogue / Full Captions. Also choose the Font Color between White, black, cyan, blue, green and red. Subtitle Size between 100 to 150% and Subtitle Background from off / Transparent / Black. Since I can’t read, I disabled subtitles. For more info on Subtitles please read our Deaf / HoH review.
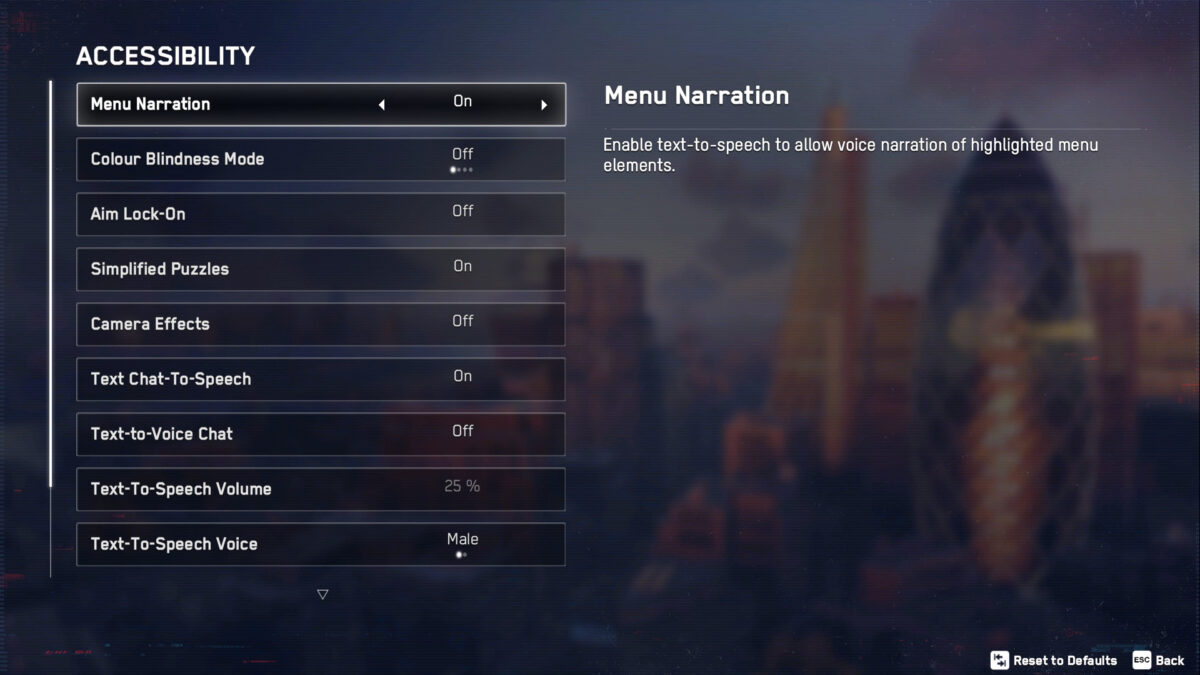

Last, we have Accessibility. Here you can turn on or off the Menu narration, Colorblind modes, Aim Lock-on that locks the aim on targets in story mode, Simplified Puzzles that help the player with network bypass puzzles. I set it to on but I didn’t understand exactly what it did in-game in the beginning, but it’s actually really important. It allowed me to solve puzzles that require connecting lines, to open or unlock certain elements in the game, as they are not visible enough for me to follow nor see where the turning points are. I would have been stuck in the beginning if not for it. The Camera Effects can be turned on or off to enable or disable camera shakes, image distortions etc. I disabled it because it removed a lot of visual barriers when you get drunk, hit with gas and it could also make me dizzy.


We can enable or disable Text Chat-To-Speech and Text-to-Voice Chat. The best part is the fact we can modify Text-To-Speech Volume from 0 to 100, Voice between Male or Female and Text-to-Speech Rate from Slow, Normal and Fast. I really like to be able to lower the volume to around 25% to avoid headaches and increase the rate to save time.
Gameplay


The game starts simple, you are inside a building to defuse a bomb. It has the perfect conditions to start learning how to do each action at a good pace. I really had a smooth start thanks to some features like Scanning Highlights, so when scanning it has an outline effect that helps to distinguish the shapes of objects. It even helps to see the blueprint of the building and highlight objects that you can interact with for a few seconds. It is especially useful to see the layout of my surroundings in dark places. The only thing I would increase is the duration of the effect.
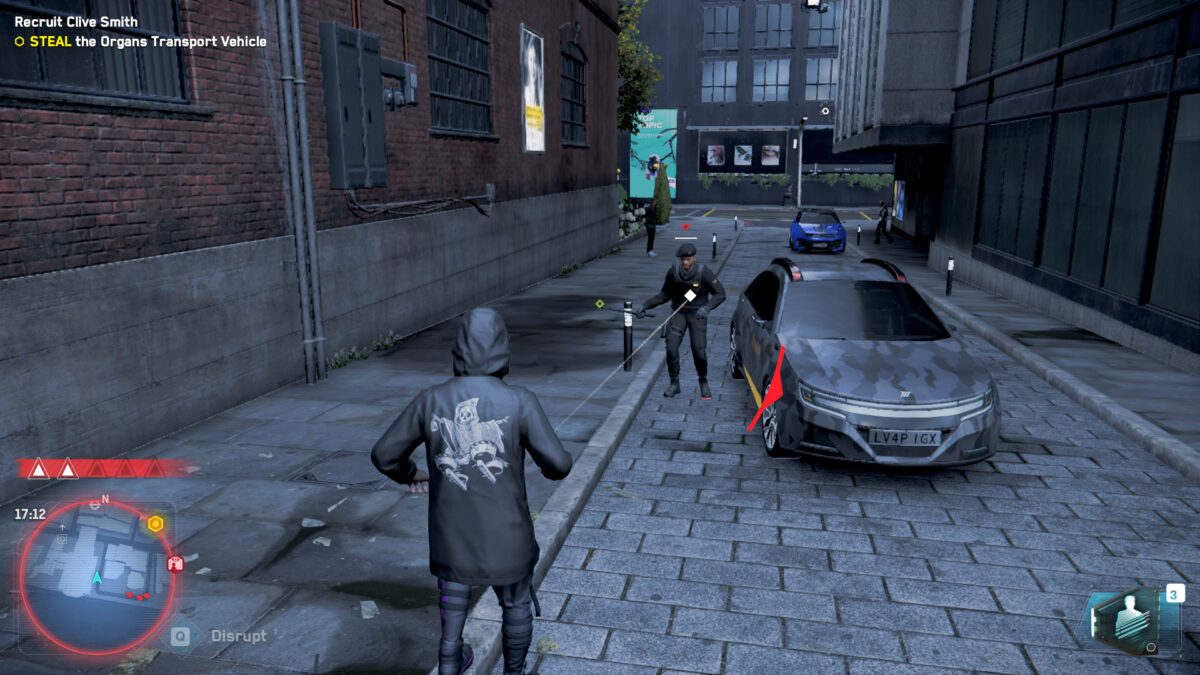

Auto-Targeting Lines display a line that links your character with the character or item you are aiming at, helping spot them faster. The Hacking Reticle adds outlines around enemies when aiming at them, similarly to the Weapon Reticle customization.


I simply love my 150% size, yellow / red Circle Reticle. I barely miss a shot. I am using this in a way that the most visible color for me, yellow, allows me to always know where I am aiming. Then, the red color is visible enough and has a contrast difference with yellow that tells me when to shoot. I didn’t use white because it has good brightness but poor contrast on many elements, like the sky and horizon. This way I don’t force my eyes so much.
Using the Spider-Bot Gadget was also quite easy to do. It was so easy to know where to go. The lighting around objects, the contrast and all those different colors really made everything look in the right place.
After we complete the prologue, we have to choose a new Dedsec member. The Menu Narration reads all the information about each person for me. It is quite impressive. It reads everything I need to know and it reads all the information in the right order. When you click on a mission it reads the Mission name, Mission current objective, mission description and finally the rewards. I really enjoy how fast I get to the important information like the mission objective.


Menu narration also reads all the tutorials that pop up on the screen. The Tutorial Menu that you can access on the main menu is also totally read by the Text-To-Speech. Teams menu, Data menu, even keyboard remapping is also totally compatible.
The feature just does not work with the Weapon/Emote wheel, Store Prices, prompts that sometimes can be important like pressing enter to pass the time to meet someone. It doesn’t read the people’s profile in the world, so the workaround I use is to add them to my recruits list and there the text is read. It also doesn’t read on the map. I wish I could point the cursor on a location, and the narrator would read it to me.
NAVIGATION
After all this enjoyment someone gave me a quest but this time I had to drive there. Navigating through the world can be exceedingly difficult especially on a game like Watch Dogs Legions, that has so much happening around you but that is not the case at all. Reaching my objectives has never been so easy in an open world game.


I just need to choose a mission on the missions menu, press the key to track the mission on the map and finally add a manual mark.


This manual mark adds a GPS line composed of light blue arrows on the road. This line is big, wide, has good contrast even during the day and I can see it all the time. I can also notice when to turn because it has a slight vertical effect on curves.


It also helps to see cars that are on top of it and that way I can avoid them. You can also press the auto-drive key to go to your destination. The hack reticle is also useful to see cars because it will always aim at a car and display the vehicle hack indicator.
These made all the difference in my experience. Not having to search for mission icons on the map which consumes tons of time and energy was a real help.
One thing that I was worried about is the in-world visual cues. You have always a lot happening and distinguishing from all these cues can be a bit overwhelming. I can know if I’m about to hack a camera or other objects like traps, cars or drones. Cameras have a different symbol (probably a camera icon) but I can know the difference by the shape of the symbol. Following mission objectives are also easy while using cameras, moving from a camera to another I just need to follow the mission objective arrow that appears on the edges of the screen and have visual contact with the objective.


The only problem that I have sometimes is to be able to see the Mission Objective indicator in the world at day time. I wish it could have a dark background because during daytime it’s hard to see due to lack of contrast.The way I found to know the exact location at daytime is by looking at the minimap Mission Objective Icon. I don’t quite use the minimap because of the lack of general contrast and its small size, but it’s very useful in this specific situation.


The map is not useful for me to find collectibles and other activities, because it doesn’t have enough contrast. Most of these icons are white/blue, small and I couldn’t see those existed until someone told me. A possible solution would be if the icon were bigger and had a black background. A high contrast mode for both map and minimap would really help to make the game a more complete experience.
Combat
As I mentioned before, reticle customization makes combat much easier. The shooting parts are more engaging and easy to play, especially when half of them are knocked out using some traps before even entering a building. In case you cannot see an enemy outline you always have the track line linked to them or even looking at the muzzle flashes. Usually drones in other games are an issue, as they are very mobile, and they are hard to destroy but in this case they are quite visible thanks to their laser lights and sound. Melee combat has its own features like a dodge sound cue and it also slows the time during the prompt to counter.


I can’t see the enemy type icon, health or enemy detection indicator. They are too small and lack contrast. I wish an option to increase their size and add a background. This was used with good results in games like Ghost Recon Breakpoint and would be helpful here too. Luckily I can see the Hostile Indicator to locate my enemies and then I can use the Scanning Highlights to mark them.
Audio
The audio is a big part of my positive experience. The world’s sound is deep, weather, cars, people talking, drones… I know exactly what is going on around me. If someone is being arrested on the other side of the road or building, I can go there and solve the problem. If I want to find the vehicle that I was driving I just need to find the one that has music playing.
Sound cues are so good. Every kind of hack has a different sound, enabling / disabling a trap, downloading data from a server for a mission, moving objects like cover walls, going to a camera, hacking cars, hacking phones to distract someone, etc. I can always know what I did listening to all these cues. These audio cues make all the difference like the sound to dodge a melee attack, being spotted while in stealth mode or even those enemies that like to talk a lot during combat giving me their location.


I just missed a sound cue to interact / collect something. I can’t find the tech points and ETO and other activities because I have no clue where they are or how they look like. I was thinking about having a cue like when we approach an objective location, a sound that tells me I am close. I also missed a sound cue to alert me that I may want to press a key. I spent some time waiting for someone to talk with and there was a prompt on the screen saying to “press enter to go to 9:00 PM”, I just had no idea.
Final Thoughts
Watch Dogs Legion is one of the most accessible open-world games for me so far. If you read my reviews, you know how difficult it can be to go from a place to another. The feature “Show on map” and the GPS line that appear when marking a location on the map was a blast, I can drive so fast from place to place. I didn’t use fast travel because I can simply go and do what I want/need without problems. It is just wonderful when developers put this barrier out of the way like this.
The menu narration added so much to the experience. It reads everything you need to progress. It is so important! How could I have the time and energy to play the game if I had to read all of that by myself? From changing settings on the options menu to buying a gadget or upgrade, weapon or clothes, reading tutorials, data. All of it became just what it’s meant to be, spend the less time possible there and I am very pleased with the results. Watch Dogs Legion just delivered me the freedom I need to explore and truly experience this story.


Victor is a gamer with very low vision who is passionate about game accessibility. When he is not glued to the PC, he spends his days with his dog on long walks in green and beautiful places. Trying to improve every day in order to contribute as much as possible with the accessibility community. You can contact him on Twitter at @VictorAndre87
Gaming Center
Gaming center adalah sebuah tempat atau fasilitas yang menyediakan berbagai perangkat dan layanan untuk bermain video game, baik di PC, konsol, maupun mesin arcade. Gaming center ini bisa dikunjungi oleh siapa saja yang ingin bermain game secara individu atau bersama teman-teman. Beberapa gaming center juga sering digunakan sebagai lokasi turnamen game atau esports.
